Whether you are repairing an industrial furnace lining, building a forge, or constructing a high-temperature kiln, the performance of your refractory cement depends entirely on how it is mixed and applied. Even the highest-grade materials will fail prematurely if improperly prepared.
Incorrect water ratios, inadequate mixing, or improper curing procedures can lead to catastrophic cracking, structural spalling, and costly unplanned downtime. This comprehensive, step-by-step engineering guide will teach you how to mix and apply refractory cement correctly, ensuring maximum thermal stability and a long-lasting high-temperature bond.
What is Refractory Cement? (The Basics)
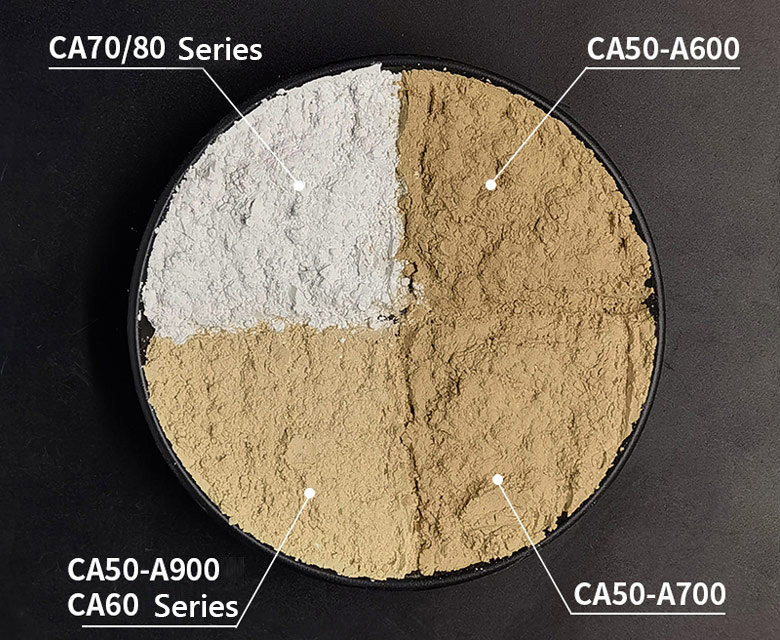
Before mixing, it is crucial to understand what you are working with. Refractory cement (often formulated with calcium aluminate cements and high-temperature aggregates) is vastly different from standard Portland cement used in general construction. While standard cement degrades and crumbles at high temperatures, refractory cement is chemically engineered to withstand extreme heat (often exceeding 1,500°C / 2,700°F) and resist severe thermal shock.
Instead of relying solely on a hydraulic (water-based) bond, refractory cement develops a ceramic bond when exposed to high operating temperatures, permanently fusing the material into a rock-hard, heat-resistant shield.
Preparation: Essential Tools and Safety Gear
Preparation is half the battle. Once refractory cement gets wet, the chemical clock starts ticking (known as its “pot life”). You must have all tools ready before opening the bag.
Essential Tools
- Mixing Equipment: A heavy-duty paddle mixer attached to a low-speed drill (for small batches) or an industrial forced-action pan mixer (for large castable projects).
- Clean Containers: Use completely clean buckets. Residue from old cement or chemicals will contaminate the new mix.
- Precision Measuring Tools: A graduated measuring jug for water. Guessing the water volume is the most common cause of failure.
- Application Tools: A masonry trowel, pointing trowel, and a rubber mallet for tapping bricks into place.
Safety Gear and Environment
Refractory dry mixes contain fine silica and alumina dust, which are hazardous if inhaled. Always wear a NIOSH-approved dust mask or respirator, safety goggles, and heavy-duty industrial gloves. Additionally, monitor the ambient temperature. For optimal curing, mix and apply the cement in a climate-controlled environment between 5°C and 30°C (41°F – 86°F).
Step-by-Step Guide: How to Mix Refractory Cement
Step 1: Dry Mixing
During shipping and storage, the heavy aggregates in the dry mix can settle to the bottom of the bag, leaving the finer bonding agents at the top. Before adding any water, pour the dry material into your mixer or bucket and dry mix it for 1 to 2 minutes. This ensures a homogenous distribution of particles.
Step 2: Measuring the Water (The Golden Rule)
The number one reason refractory linings fail is over-watering. Excess water weakens the structural integrity and creates large pores. When the furnace is heated, trapped water turns to steam, causing the cement to explode or crack. Strictly follow the Technical Data Sheet (TDS) provided by the manufacturer. Most dense refractory cements require only 8% to 12% water by weight.
Step 3: Adding Water Gradually
Use only clean, drinkable (potable) water. Do not dump all the water in at once.
- Add about 70% to 80% of your measured target water into the dry mix.
- Mix continuously for 2 to 3 minutes until the material becomes a damp, crumbly consistency.
- Slowly add the remaining water in small increments while mixing, stopping the moment the correct consistency is reached. Total wet mixing time should not exceed 4 to 5 minutes.
Step 4: Achieving the Perfect Consistency
How do you know it is right? Perform the industry-standard “Ball-in-Hand” test. Take a handful of the mixed cement and squeeze it tightly into a ball. Toss it a few inches into the air and catch it.
- Too Dry: The ball crumbles and falls apart.
- Too Wet: The ball slumps flat in your hand, and excessive liquid bleeds to the surface.
- Perfect: The ball retains its shape perfectly without crumbling, and leaves only a slight moisture residue on your glove.
How to Apply Refractory Cement Like a Pro
Surface Preparation
Refractory cement will not bond to dirty, oily, or dusty surfaces. Thoroughly clean the area or the bricks you intend to bond.
Expert Tip: If you are applying wet cement onto older, dry porous refractory bricks, the old brick will act like a sponge, instantly sucking the moisture out of your new cement and causing a weak “dry joint.” To prevent this, lightly mist the surface of the old bricks with clean water just before application—do not soak them, just dampen them.
Application Techniques
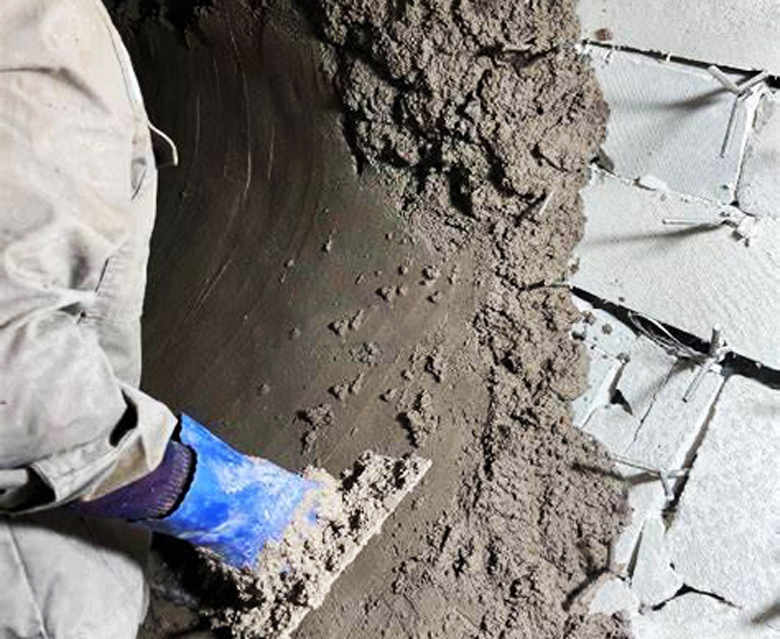
When using the cement as a mortar to lay fire bricks, apply a thin, even layer. Refractory joints should be much thinner than standard masonry joints—typically only 2mm to 3mm thick. Use the “rub and tap” method: place the brick, rub it back and forth slightly to squeeze out air pockets, and tap it firmly with a rubber mallet to ensure a tight, face-to-face bond.
The Most Critical Step: Curing and Drying
Your physical work is done, but the chemical work has just begun. Skipping the curing phase will destroy your lining.
1. Air Curing (Hydration)
Allow the applied cement to air-cure at ambient temperature for at least 24 to 48 hours. Keep the environment humid. If the atmosphere is too dry, cover the cement with damp burlap or plastic sheeting to prevent premature moisture loss.
2. The Bake-Out Schedule (Heat-Up Curve)
You cannot simply fire up the furnace to maximum temperature. You must follow a strict heat-up curve to slowly drive out the chemically combined water. A typical bake-out might involve raising the temperature by 15°C to 25°C per hour, holding it at 110°C (to boil off free water), then holding it again around 300°C-400°C (to release crystal water), before finally ramping up to operating temperatures. Always consult your manufacturer’s specific bake-out schedule.
Common Mistakes When Mixing Refractory Cement
Avoid these costly engineering pitfalls:
- Using Contaminated Water: Water from dirty buckets can introduce alkalis or organic matter that disrupts the chemical setting process.
- Over-watering for “Workability”: Adding extra water to make it easier to trowel is a fatal mistake that drastically reduces the cement’s cold crushing strength and causes massive shrinkage cracks.
- Exceeding Pot Life: Only mix as much material as you can realistically apply within 20 to 30 minutes. If the cement begins to harden in the bucket, never add more water to re-temper it. Throw it away and mix a fresh batch.
Frequently Asked Questions (FAQ)
How long does refractory cement take to dry?
Initial setting (hardening) takes 24 to 48 hours at room temperature. However, it is not truly “dry” until it has undergone a controlled high-temperature bake-out process to evaporate the internal moisture.
Can you add regular Portland cement to refractory cement?
Absolutely not. Standard cement contains fluxes that will completely destroy the high-temperature resistance of the refractory mix, causing it to melt or crumble inside your furnace.
How thick should you apply refractory cement?
When used as a mortar between fire bricks, joints should be extremely thin (2mm – 3mm). If you are using a refractory castable to pour a solid lining, thicknesses can range from a few inches to over a foot, depending on the engineering design.
Does refractory cement need heat to cure?
It needs time at ambient temperature to set chemically (hydraulic bond), but it requires high heat (usually above 1000°C) during its first firing to form its ultimate ceramic bond and reach its maximum structural strength.
Conclusion & Sourcing Quality Refractory Cement
Mixing and applying refractory cement is a precise science. By strictly controlling your water ratio, utilizing the ball-in-hand test, and rigorously following the curing and bake-out schedules, you can ensure a flawless, crack-free furnace lining that withstands the harshest industrial conditions.
However, exceptional masonry skills cannot compensate for inferior materials. To maximize your equipment’s service life, you need premium-grade materials engineered for your specific thermal environment.
Kerui Refractory is a trusted global manufacturer of high-performance refractory cements, castables, and high-temperature mortars. From general-purpose fireclay mortars to ultra-high-temperature alumina cements, we provide the exact technical formulations your project demands.
Contact the Kerui engineering team today to get customized mixing specifications, technical data sheets (TDS), and factory-direct pricing for your next project.
 Whatsapp
 WeChat